Search This Blog

Tuesday, August 30, 2011

Deployment of Page in APPS - OAF


The steps in brief are :

· Development of the TestPagePG.xml page in local machine
· FTP the related source code/files to the Oracle APPS environment.
· Importing the page to the Database through Import Command.
· Registration of the page in the Oracle Apps environment.


On project compilation the class files along with xml files are generated in Myclasses.


The Folder Structure for xml pages and respective Controllers are as below
C:\Jdevhome\Jdev\myclasses\xxx\oracle\apps\fnd\framework\webui\*
C:\Jdevhome\Jdev\myclasses\xxx\oracle\apps\fnd\framework\server\*

The First step will be to move the files into the JAVA_TOP with the help of any FTP Tool.

Just drag and dropped the xxx  folder from local m/c to Apps Java top path.


Importing the XML files:

Run the import scripts for the Page and Regions.

The import command is


import C:\Jjdevhome\jdev\myprojects\xx\oracle\apps\fnd\framework\webui\TestPagePG.xml -rootdir C:\jdevhome\jdev\myprojects -username apps -password apps -dbconnection "(DESCRIPTION=(ADDRESS=(PROTOCOL=tcp)(HOST=10.255.35.20)(PORT=1525))(CONNECT_DATA=(SID=DEV)))"

The command is to be run from Jdeveloper/Jdevbin/Jdev/Bin from command prompt.

Registering the Main Page in APPS.


Login through System Administrator Resp.

Select Application -- Function.

1. Enter the Function Name, User Function Name and Description

2. Enter Properties (Tab) Type as SSWA jsp function


3. In Web HTML Tab enter the page path
OA.jsp?page=/xxx/oracle/apps/fnd/framework/webui/TestPG

Attach the function with a desired menu and then run from the respective responsibility.

Last and the important step :-- DONOT forget to bounce the Appache server.

Important Profile Options in OAF


FND_Diagnostics


Setting the FND : Diagnostics (FND_DIAGNOSTICS) profile option to "Yes" will enable the diagnostics global button to be rendered on the screen. Pressing this button brings the user to an interface where the user can choose what type of logged messages to display.


Personalization Levels


Personalizations can be enabled at the function, site, operating unit or responsibility level. Personalizations at lower levels override personalizations at higher levels. Values inherit the definition from the level immediately above unless changed.


FND: Personalization Region Link Enabled :
Valid values:  Yes - renders the "Personalize  Region" links above each  region in a page. Each link  takes you first to the Choose Personalization Context page, then to the Page Hierarchy Personalization page with focus on the region node from which  you selected the "Personalize  Region" link.


Personalize Self-Service Defn – Set this profile to Yes to allow personalizations.


Disable Self-Service Personalization - Yes will disable all personalizations at any level.


FND: Personalization Document Root Path (new in 11.5.10) - Set this profile option to a tmp directory with open (777)  permissions for migrating personalizations between instances.


How to See Log on Page


Enable profile Option FND_Diagnostics to "Yes" at User OR Site Level.


In Controller write this code:-
pageContext.writeDiagnostics(this, "Checking profile options", 1);


In Application Module write this code
getOADBTransaction().writeDiagnostics(this, "Checking Profile Option", 1);


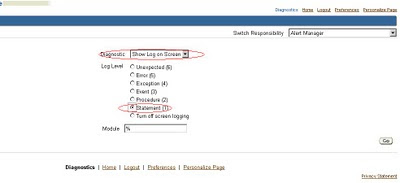
Now to see log on screen Click on “Diagnostics” on Page [Top right on page]


Then Choose Show Log on Screen from the picklist and choose log level as Statement Level and Click on Go


Learn OAF

Learn OAF

Getting started with OA Framework

Oracle Applications Framework (OA Framework) is the   Oracle Applications development and deployment platform for HTML-based business Applications.

OA Framework is based on the industry-standard J2EE MVC design pattern.

The MVC architecture is a component-based design pattern with clean interfaces between the Model, View, and Controller.

♣ The Model is where the application implements its business logic. All the BC4J components in OAF comes under Model like AM (Application Module), VO (View Object), EO (Entity Object), VL (View Link) & AO (Association Object).

♣ The View is where the application implements its user interface. View means the UI (User Interface) that is visible to the Users.

♣ The Controller is where the application handles user interaction and directs business flow. Controller is a simple javaclass file that contains methods for initial page request and post back request.

For more details please refer

The next step is to determine the correct JDev patch for your development system. We can find the correct version of Jdeveloper with two ways:

1) You can check the framework version in your instance by using http://host:port/OA_HTML/OAInfo.jsp,


2) Click “About this page” link on the bottom left of any OA Page and click on Technology Components.


If you are not able to see it please refer below link

After knowing the patch number you can download it from https://support.oracle.com
Note ID: ID 787209.1 - How to find the correct version of JDeveloper to use with eBusiness Suite 11i or Release 12.

♣  Once downloaded, follow the installation steps set out in the OAEXT_README.txt document , located in the root directory of your patch file.

♣  The JDeveloper patch includes a very comprehensive documentation library, after installation you can locate the documentation index here: DEV_INSTALL_DIR/jdevdoc/index.htm

♣  Follow the “You are Customer, Consultant or Support Representative” in Chapter 1: “Setting Up your Development Environment” of the OA Framework

I suggest you study Chapters 1, 2 and 3 of the OA Framework developers guide; this will present you with a detailed introduction to OA Framework development concepts. Chapter 8 of the developers guide covers OA Framework standards and guidelines.

The Oracle Applications Framework ToolBox Tutorial is a comprehensive step by step guide to OAF development, extension and personalization. The tutorial will guide you from creating your first “Hello World” program right through to multi-step update pages, partial page rendering techniques and advanced charts and graphs.


Where do I get help?

♣ Oracle Applications Framework Developer's Guide (Included in JDev Installation) 
The Developer's Guide fully documents the capabilities of the Framework including instructions, examples and essential standards for implementing business-tier objects, UI components and server-side features.

 Oracle Applications Framework ToolBox Tutorial Application (Included in JDev Installation)
The ToolBox Tutorial application is a sample application accompanied by extensive examples with step-by-step instructions that demonstrate the usage of business objects and UI components to build OA Framework based application pages, against a simple Purchase Order type application schema, installed on your 11i instance.

♣ OA Framework Discussion Forum on the Oracle Technology Network
Discussion forum for OA Framework Extensions and the OA Extension to Oracle9i JDeveloper, OA Framework Forum (http://forums.oracle.com/forums/forum.jspa?forumID=210). You can use the forum to post questions and exchange information with other users working with OA Framework technology.

 Oracle Applications Product Documentation
Some products may provide additional information on extending application specific business objects and functionality. Consult Oracle Metalink (http://metalink.oracle.com) under the respective product for more information.

About OAF – Downloading and Configuring JDeveloper


This article will describe the process for downloading & installing the correct version of JDeveloper for development on your instance of E-Business Suite. It will discuss how to identify the correct version of JDeveloper to use and how to configure your OAF environment on your local machine.
Oracle JDeveloper (JDev) is the development tool we use to develop Oracle Applications Framework components, due to variations in the framework different versions of Oracle Applications require development to be performed on different versions of JDeveloper or at least the OAF flavour of JDeveloper. JDeveloper can be downloaded from metalink however prior to visiting meta link you will need to establish which version and patch set you are running as regards Oracle Apps.
To identify the correct version of Oracle Applications Framework we need to activate diagnostics. You can do this by ensuring the profile option “FND: Diagnostics” is set to “Yes”. Close your browser session and restart Oracle Applications, Log in and click the “About this Page” Link which can be found in the page footer.
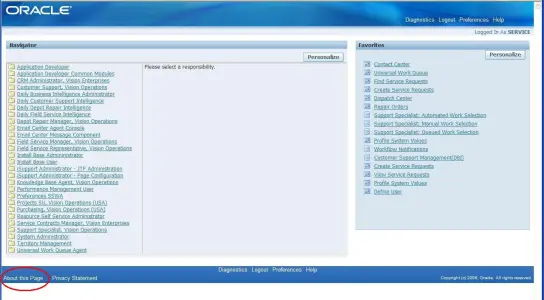
Fig 1
Fig 1
When the “About Page” loads click the “Technology Components” Tab. You will be able to identify the version of Oracle Applications from the OA Framework version.
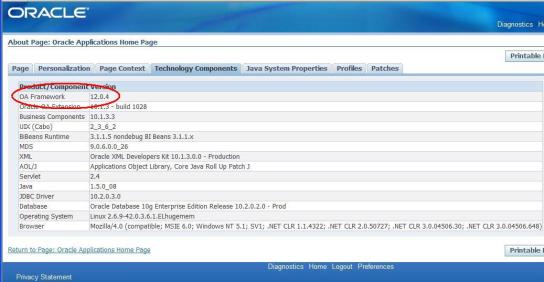
Fig 2
Fig 2
 
Now that we have identified the correct version of OAF we can visit metalink https://metalink.oracle.com note 416708.1 and download the corresponding version of JDeveloper. Download the file to a convenient directory on your machine, in this example we would download patch 6908968.
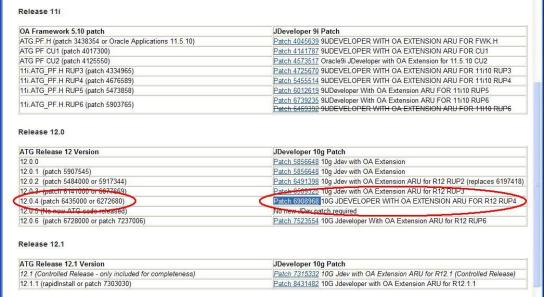
 
Fig 3
Fig 3
JDeveloper comes as a zip file and does not require any installation as such. We do however need to follow a few setup instructions to get up and running particularly if you are a developer that works on various versions of E-Business suite and thus will be using different versions of JDeveloper.
First unzip the JDeveloper zip file to a convenient directory. I recommend that you create a separate directory such as C:\JDeveloper\JDEV_R12_RUP4 . This will allow you to create further directories in the event that you download more versions and they will not conflict with each other. Once unzipped you will have three directories:
JDEVBIN: This is the JDeveloper software directory and contains the executables for the IDE.
JDEVDOC: This contains all help documentation including the OAF Developer Guide which will become invaluable to you as an OAF developer
JDEVHOME: This is where by default all of your project files and code will be created, sort of a my documents folder for JDeveloper.
Once installed we will need to create some shortcut links for your desktop so that you can launch JDeveloper and access the Developer Guide. Locate and create shortcuts for the following files for your desktop:
C:\yourInstallDirectory\jdevbin\jdev\bin\jdevW.exe for windows and jdev.exe for any other operating system.
 C:\yourInstallDirectory\devdoc\index.htm
The jdevW.exe/jdev.exe links will launch JDeveloper and the index.htm will open the help documentation which contains a link to the OAF Dev Guide.
Before we launch JDeveloper we will complete one more configuration task and re-point the JDEVHOME directory to a central location i.e. My Documents or another partition where you keep all your files. This process is very helpful when it comes to running multiple versions of JDeveloper. Right Click on the “My Computer” icon and select the “Properties” option. Click the “Advanced” tab and then “Environment Variables”. Create a new user variable by clicking on the “New” button and enter JDEV_USER_HOME as the environment variable name and the path to your central directory as the value i.e. d:\my_files\jdev_home.
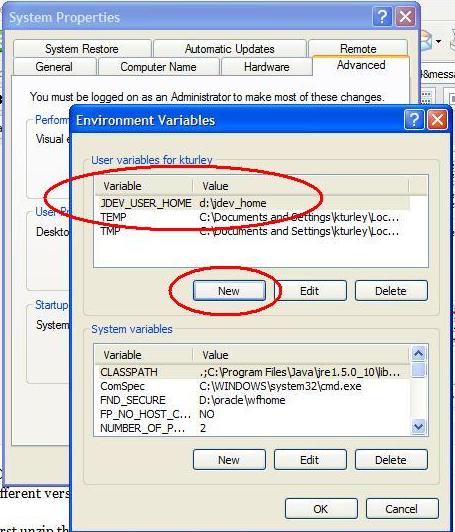
Fig 4
Fig 4
Click OK and close the “My Computer” windows.
When JDeveloper is launched it will now automatically save your files and settings to the central user home rather than the default home in the installation directory. Always ensure that you back up your central user home to prevent the loss of critical project files.
 Now we have our JDeveloper environment ready we need to get some environment specific setup completed so that you can interact with your E-Business Suite instance. In order to enable us access to apps we will need to obtain the DBC file and copy it to our local machine. The best way of doing this is to log into the application server using a tool like putty and obtain the file from $FND_SECURE by ftp using a tool like winscp, failing this you could obtain it from your DBA. Once you have your DBC file create a folder in your JDEVHOME directory called dbc_files\secure\ (Remember the JDEVHOME is the location that we assigned to the JDEV_USER_HOME environment variable in the previous steps) and copy the DBC file to it.
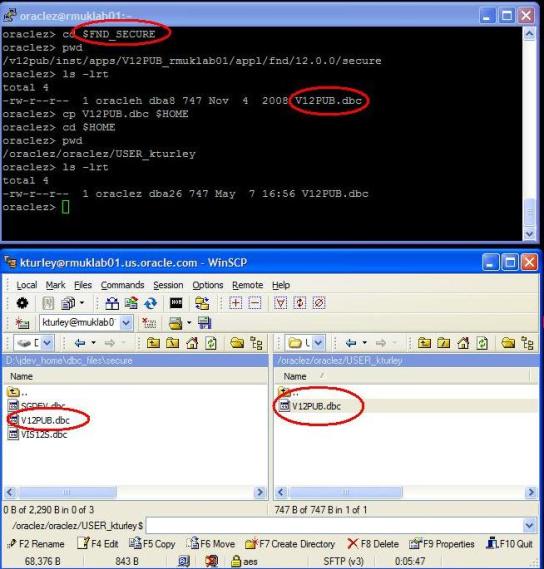
Fig 5
Fig 5

Now that we have our DBC file we can open JDeveloper and configure the database connection. Launch your JDeveloper download by clicking the jdevW.exe link that we created earlier.
 
If you are using JDeveloper 10g i.e. for an Oracle Applications Version of R12 then you will be prompted to see if you want to migrate from another version, select “No” for this example. You will also see a tip of the day, click the “Close” button.
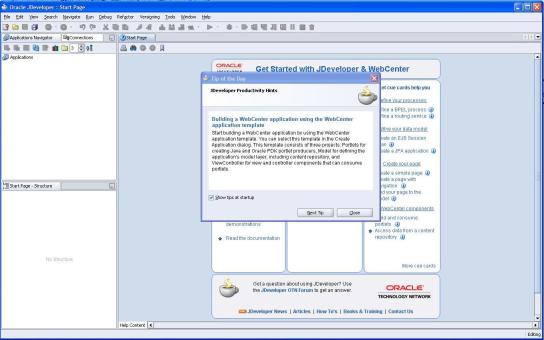
 
Fig 6
Fig 6
Click on the Connections tab and right click the “Database” folder and select “New Database Connection”.
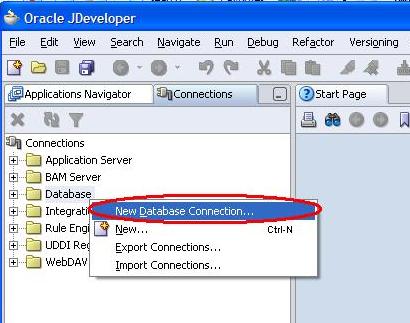
Fig 7
Fig 7
If you are using JDeveloper 9i then the Database folder can be found in the “System – Navigator” pane under the connections node, you will not have the Connections Tab.
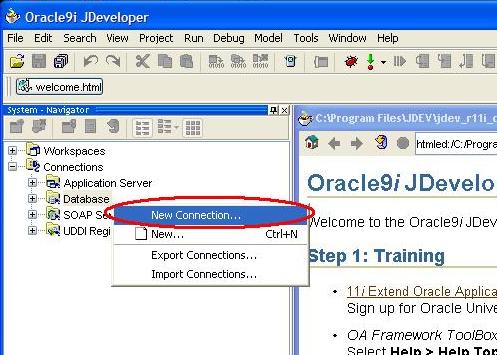
Fig 8
Fig 8
 
You will be presented with the Database Connection Wizard. Click “Next”
 
When prompted enter a name to represent your connection, this can be anything you like however I have just used the database SID for simplicity
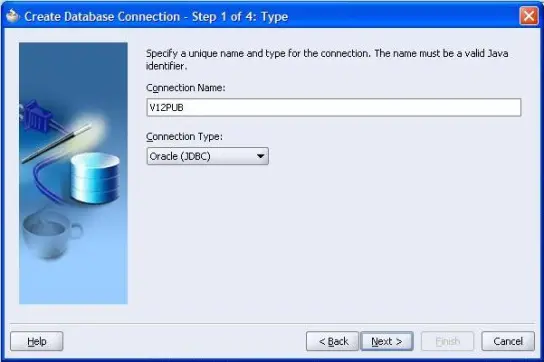
 
Fig 9
Fig 9
Click “Next” and enter the database username and password, this will need to be the apps account and password, leave the role field blank.
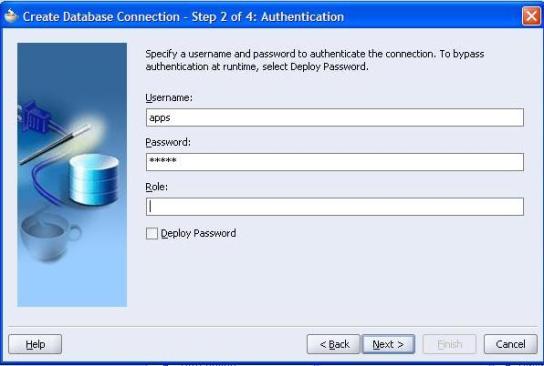
 
Fig 10
Fig 10
Click “Next” and enter the database hostname, port and SID
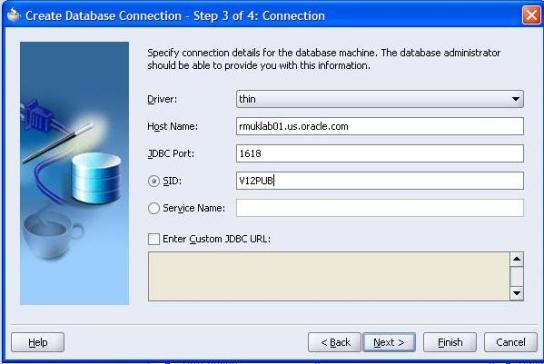
 
Fig 11
Fig 11
 Click “Next” and click “Test Connection”, you should receive a successful connection message.
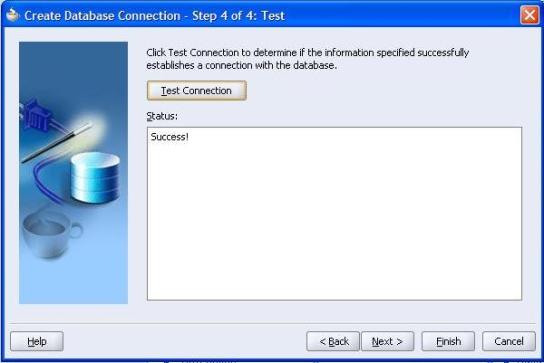
 
Fig 12
Fig 12
 OK, now that we have the database connection configured we need to make sure that we can connect to our E-Business suite instance from within JDeveloper. We can use the toolbox tutorial files to do this which get shipped with the JDeveloper build.
Click File > Open and navigate to JDEV_USER_HOME/myprojects and select the file toolbox.jws If you are running JDeveloper 10g you will automatically be in your JDev User Home with 9i you may have to navigate there manually due to a bug in the IDE.
If you are running JDeveloper 9i select the “Show Categories” icon, this will help us identify the test jsp page to run later.
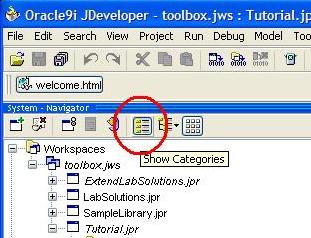
Fig 13
Fig 13
If you are running JDeveloper 10g select the “Applications Navigator” tab to see the opened workspace. 
 
Now that we have the toolbox workspace open we need to modify the project settings in Tutorial.jpr, navigate to the project node under the toolbox node and right click on the “Tutorial” node and select “Project Properties” in 10g and “Project Settings” in 9i.
 
You will be presented with a properties screen with several options in the left hand pane, expand the “Oracle Applications” node and select the “Run Time” sub menu item. Your screen will look similar to this.
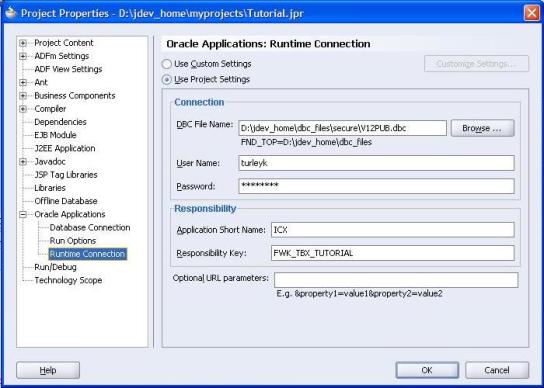
 
Fig 14
Fig 14
Configure the credentials as above. Select your DBC file that we downloaded earlier, enter YOUR username and password for Oracle Applications and ensure that you have the responsibility “Framework Toolbox Tutorial” assigned to that logon. To check that your logon is configured correctly run the SQL:
select fnd_web_sec.validate_login('','') from dual;
This should return ‘Y’ as the result indicating that your account is setup correctly.
Repeat the above test for the Guest account specified in your DBC file (Usually GUEST/ORACLE).
Enter ICX as the application short name and FWK_TBX_TUTORIAL as the responsibility, these parameters define which responsibility we will be running the project under.
Select OK when you have finished.
We are now ready to run the test project:
In JDeveloper 9i navigate to the file test_fwktutorial under Workspaces > toolbox.jws > Tutorial.jpr > HTML Sources > test_fwktutorial.jsp
In JDeveloper 10g navigate to the file test_fwktutorial under Applications > toolbox > tutorial > Web Content > test_fwktutorial.jsp
Right click the test_fwktutorial.jsp node and select “Run” in 10g and “Run test_fwktutorial.jsp” in 9i
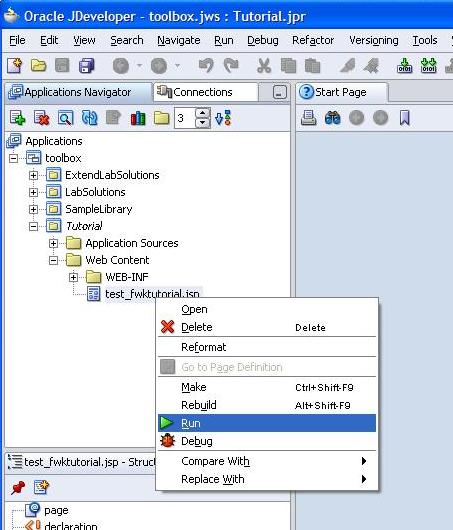
Fig 15
Fig 15
 
If you are running on a remotely hosted environment prepare for this process to be slow (anywhere from 2 – 10 minutes dependant on your network) you are now effectively running an embedded server from your local machine and a lot of information will be pinging to and from your machine and the application server on the environment, normally these two components would be hosted on the same server and thus the performance will be seriously degraded.
 
Once complete you should see the below screen.
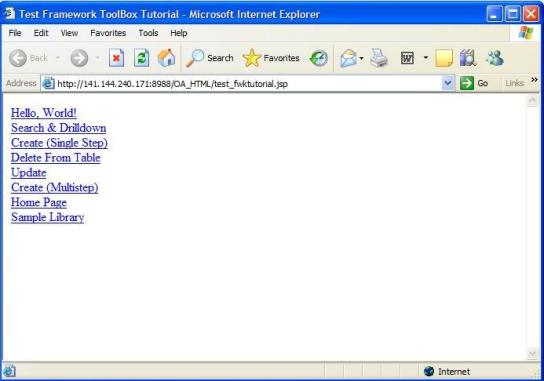
 
Fig 16
Fig 16
 
Congratulations! You have successfully configured JDeveloper.
 
If you experience problems configuring your JDeveloper version then refer to meta link note 330236.1 for guidelines on raising a service request.

Tuesday, August 23, 2011

Buyer Setup

1) In HRMS  ‘People > Enter and maintain’,Create New Employee  whose Last name must be same as User name Which we are logged in. Go to Assignment, Enter Org,Position and Job.Save the record.
2) In Sysadmin ‘Security > User > Define’,Query for the user & enter ‘person’ field with employee name created in HRMS.Save the record.
3) In PO ’ Setup >Personal > Buyers ‘, Create new buyer for our user. Now we can create a PO
4)  In PO  ’ Setup >Approvals > Approval groups ’, Create an approval group.
5)  Go to ‘Setup >Approvals > Approval Assignments’ , Select the position ( as given in HRMS) and assign approval group for different document types. Now we can approve Documents

Friday, August 19, 2011

How To Use Oracle E-Business Suite Learn By Example Story


The below example explains a few of the important terms and concepts used in the Oracle E-Business Suite. This would be a good starting point for the beginners to better understand the concepts behind Oracle Applications.

Say Harry is the owner of a wholesale fruit shop. He buys various fruits like apples, oranges, mangos and grapes etc from farmers directly and sells them to retail shop owners and also to the direct customers.

The farmers are referred to as VENDORS/SUPPLIERS in Oracle Applications. Harry
keeps track of all his vendors’ information like addresses,
bank account and the amount he owes to them for the fruits that he bought etc, in a book named PAYABLES.

Harry gets an order from a retail shop owner of Fruit Mart, for a shipment of 11 bags of apples, 25 bags of oranges and 32 kgs of grapes. In Oracle Apps, bags and kgs are referred to as UOM (unit of measure), Fruit Mart is called CUSTOMER and the order is referred to as SALES ORDER. Harry maintains a book called
ORDER MANAGEMENT where he writes down all the details of the SALES ORDERS that he gets from his customers.

Say the fruits have been shipped to the customer Fruit Mart. Harry now sends him the details like cost of each bag/fruit, the total amount that the customer has to pay etc on a piece of paper which is called INVOICE / TRANSACTION. Once the INVOICE has been sent over, the customer then validates this against the actual quantity of fruits that he received and will process the payments accordingly. The invoice amount could be paid as a single amount or could be paid in installments. Harry’s customer, Fruit Mart pays him in installments (partial payments). So Harry has to make a note of the details like date received, amount received, amount remaining, amount received for what goods/shipments/invoice etc, when Harry receives the payments. This detail is called RECEIPT, which will be compared to the invoice by Harry to find how much Fruit Mart has paid to him and how much has to be paid yet. This information is maintained in a book named RECEIVABLES to keep track of all the customers, their addresses (to ship the items), what and how much he has shipped to his customers and the amount his customers owe him etc.

Harry’s fruit business has begun to improve and has attracted more and more customers. As a result, Harry decided to buy a cold storage unit where he could stock more fruits. In Apps, this cold storage unit is known as WAREHOUSE and all the fruits are referred to as INVENTORY. Due to increase in customers, Harry needs to hire more people to help him out in his business without any hiccups. These workers are called EMPLOYEES. At the end of every month, Harry pays the salary for all his employees through Checks. These checks are nothing but PAYROLL in Apps.

At the end of every month, Harry prepares a balance sheet in a book called GENERAL LEDGER to determine how much profit/loss he got and keeps track of the money going out and going in.

As the business grows, it becomes impossible to record everything on a paper. To make everybody’s life easier, we have very good tools in the market, which help the business men to keep track of everything. One such tool is Oracle E-Business Suite.

Oracle Applications is not a single application, but is a collection of integrated applications. Each application is referred to as a module and has it own functionality trying to serve a business purpose.

Few of the modules are Purchasing, Accounts Payables, Accounts Receivables, Inventory, Order Management, Human Resources, General Ledger, Fixed Assets etc.

Here is a high level business use of various modules:

Oracle Purchasing handles all the requisitions and purchase orders to the vendors.

Oracle Accounts Payables handles all the payments to the vendors.

Oracle Inventory
deals with the items you maintain in stock, warehouse etc.

Order Management helps you collect all the information that your customers order.

Oracle Receivables help you collect the money for the orders that are delivered to the customers.

Oracle Human Resources helps maintain the Employee information, helps run paychecks etc.

Oracle General Ledger receives information from all the different transaction modules or sub ledgers and summarizes them in order to help you create profit and loss statements, reports for paying Taxes etc. For Example: when you pay your employees that payment is reported back to General Ledgers as cost i.e money going out, when you purchase inventory items and the information is transferred to GL as money going out, and so is the case when you pay your vendors. Similarly when you receive items into your inventory, it is transferred to GL as money coming in, when your customer sends payment, it is transferred to GL as money coming in. So all the different transaction modules report to GL (General Ledger) as either “money going in” or “money going out”, the net result will tell you if you are making a profit or loss.

All the equipment, shops, warehouses, computers can be termed as ASSETS and they are managed by Oracle Fixed Assets.

There is a lot more in Oracle applications. This is the very basic explanation just to give an idea of the flow in ERP for the beginners.


Terminology often used in Oracle Applications:


  1. Invoice
  2. Receipt
  3. Customer
  4. Vendor
  5. Buyer
  6. Supplier
  7. Purchase Order
  8. Requisition
  9. ACH: Account Clearance House
  10. Sales Order
  11. Pack Slip
  12. Pick Slip
  13. Drop Ship
  14. Back Order
  15. ASN: Advance Shipping Notice
  16. ASBN: Advance Shipping Billing Notice
  17. ATP: Available to Promise
  18. Lot/Serial Number
  19. DFF: Descriptive Flex Fields
  20. KFF: Key Flex Fields
  21. Value Sets
  22. Organization
  23. Business Unit
  24. Multi Org
  25. Folders
  26. WHO Columns
  27. Oracle Reports
  28. Oracle Form
  29. Workflow Builder
  30. Toad
  31. SQL Developer
  32. SQL Navigator
  33. Discoverer Reports
  34. XML/BI Publisher
  35. ADI: Application Desktop Integrator
  36. Winscp
  37. Putty

Thursday, August 18, 2011

Payment batches in Payables

Introduction:

We will see how we can use Payments Batches to create payments for multiple invoices that meet the selection criteria you specify.


Process:

The below diagram illustrates the sequence of steps to be followed to complete the payment batch. Each of the steps is initiated from the Payment Batch Actions window.


1. Initiate the payment batch by entering criteria for invoices you want to pay. Payables selects invoices and builds the payments; it determines which invoices will be paid on each payment document and lists this information for you on the Preliminary Payment Register.

At any time before formatting, you can optionally modify the payment batch. You can prevent payment to a supplier, prevent payment of a particular invoice, change the invoice amount, or add an invoice that Payables did not originally select.


Note: System will default current date as a Pay Through Date. This date will identify the invoice due date that system will use to pick up all due invoices within the timeframe. Pay Through Date could be before or after the current date.


Click on Actions and Check Select Invoices and Build Payments as shown in the below screenshot.


2. Format payments to have Payables produce an output file.

Click on Actions and Check Format Payments as shown in the below screenshot.


3. Print checks from the output file, create electronic payments, or deliver the output file to your bank to disburse electronic payments.


4. Confirm the payment batch by recording the document numbers associated with each payment. During this step Payables updates the invoice status to paid and associates a payment number with the invoice and invoice payment.


Click on Actions and Confirm Payment Batch as shown in the below screenshot


Give in the Status and Document Number and Click Confirm.

The To field should have the value derived using the below formula:

To = From + Overall Payment Count – 1 (Example: 3000578 = 3000571 + 8 – 1)


Notes:


You can check the status of a payment batch at any time during the payment batch process by checking the Status field in the Payment Batches window. You can also check the status of payment processes in the Requests window.

You can cancel the Payment batch at any time before you confirm by selecting Cancel CheckBox in Actions Window.

You can restart a payment batch if a concurrent process fails. You can also restart check printing if the printer malfunctions during check printing.

Procure To Pay Cycle

In this article, we will see the steps involved in Procure to Pay Cycle. Here is the diagrammatic representation:


1) Create Requisition:

Requisition is nothing but a formal request to buy something (like Inventory material, office supplies etc) needed for the enterprise. Only an employee can create one. There are two types of requisitions:


Internal Requisition: Internal requisitions provide the mechanism for requesting and transferring material from one inventory to other inventory.

Purchase requisition: Unlike Internal requisitions, Purchase requisitions are used for requesting material from suppliers.


Navigation:

Purchasing Vision Operations (USA) > Requisitions > Requisitions

Choose the requisition type and enter the Item, quantity, Price details in the Lines tab.


In Source Details tab, specify the Buyer name.


Click the Distributions button. Enter the Charge Account.


Save the work. The status of the requisition will now be “Incomplete”. And now the Approve button is highlighted. The requisition needs to be approved first before proceeding further by the concerned authority. Submit this requisition for Approval by clicking on the Approve button. The status will now be updated to “In Process” .The workflow then will send an Approval notification to the concerned person (derived based on hierarchy used—Position or Supervisor hierarchy) using which he can Approve or Reject the requisition.


At any time the status of requisition can be checked using the Requisition summary window.


Navigation:

Requisitions > Requisition Summary

Enter requisition number and click on the find button.


We can also check the Action History of requisition (it will show details about who has submitted, approved and cancelled the requisitions)

as below:


Navigation:

Tools menu > Action History.


Underlying Tables:

PO_REQUISITION_HEADERS_ALL

PO_REQUISITION_LINES_ALL

PO_REQ_DISTRIBUTIONS_ALL


2) Create Purchase Order:


There are 4 types of Purchase Orders:

1. Standard PO: A Standard PO is created for one–time purchase of various items

2. Planned PO: A Planned PO is a long–term agreement committing to buy items or services from a single source. You must specify tentative delivery schedules and all details for goods or services that you want to buy, including charge account, quantities, and estimated cost.

3. Blanket agreement: A Blanket PO is created when you know the detail of the goods or services you plan to buy from a specific supplier in a period, but you do not know the detail of your delivery schedules.

4. Contract agreement: Contract purchase agreements are created with your suppliers to agree

on specific terms and conditions without indicating the goods and services that you will be purchasing


Navigation for creating a standard PO:

Purchase Orders > Purchase Orders


Choose type as Standard Purchase Order. Enter the Supplier, Buyer. In the Lines tab, specify the line number, line type, Item, quantity, price etc.


Click Terms to enter terms, conditions, and control information for purchase orders.

Click Currency button to enter and change currency information for purchase orders, RFQs, and quotations.

Click Shipments button to enter multiple shipments for standard and planned purchase order lines Purchase order shipment specifies the quantity, ship–to organization and location, date you want your supplier to deliver the items on a purchase order line, and country of origin for the items. When you save, Purchasing creates distributions depending on the default information available.


To enter more shipment information, select the More tab.

  • Enter the Receipt Close Tolerance percent, Invoice Close Tolerance percent to set the receiving and invoice close point.
  • Select one of the following options for Match Approval Level:
Two–Way: Purchase order and invoice quantities must match within tolerance before the

corresponding invoice can be paid.
Three–Way: Purchase order, receipt, and invoice quantities must match within tolerance
before the corresponding invoice can be paid.
Four–Way: Purchase order, receipt, accepted, and invoice quantities must match within
tolerance before the corresponding invoice can be paid.
  • Select an Invoice Match Option:
Purchase Order: Payables must match the invoice to the purchase order.

Receipt: Payables must match the invoice to the receipt.

Save the work.


Click the Receiving Controls button to enter receiving control information for purchase orders.

- Enter the maximum acceptable number of Days Early and Days Late for receipts.

- Enter the Action for receipt date control.

- Enter the maximum acceptable over–receipt Tolerance percent (receipts that exceed the

quantity received tolerance).

- Enter the Action for Overreceipt Quantity.

- Select Allow Substitute Receipts to indicate that receivers can receive substitute items in place

of ordered items.

- Enter the default Receipt Routing that you assign goods: Direct Delivery, Inspection Required,

or Standard Receipt.

- Enter the Enforce Ship To location option to determine whether the receiving location must be

the same as the ship–to location.

Save the work.


Click Distributions button to enter distributions for the shipments.

Select more tab to enter more details and the requisition number (optional).

Save the work.


Click on the Approve button to initiate the Approval process.


Underlying Tables:


PO_HEADERS_ALL

PO_LINES_ALL

PO_DISTRIBUTIONS_ALL (REQ_HEADER_REFERENCE_NUM in Distributions table is the Requisition number for this PO)


3)Create Receipt:

Create a receipt to receive the items in the Purchase Order.


Navigation:

ReceivingàReceipts

Enter the PO Number and select find button.


Go to Lines, check the lines you want to receive in the PO.


Click on Header button and Save which creates the receipt.


Receipt Tables are:

RCV_SHIPMENT_HEADERS

RCV_SHIPMENT_LINES (Lines Table has PO_HEADER_ID)


4)Create Invoice in Payables:

Once the goods are received, it’s time to pay the vendor for the goods purchased and hence the invoices are created.


Navigation:

Payables, Vision Operations (USA) > InvoicesàEntryàInvoices

Enter type — Standard, supplier information and amount.


Click the Match button to match to either Purchase Order or Receipt (depending on the Invoice Match option specified on the PO) and avoid manually entering the invoice.

Enter the PO Number you want match to and click Find.


Select the lines required and click on Match button.


Click on Distribute button
to navigate to the Match to Purchase Order Distributions window.

This creates the invoice and you can see the status of the invoice as “Never Validated”. it has to be Validated and Accounted before you can pay it.


Validating the Invoice:

Click on Actions Button and Select “Validate”. Click on OK button.


Now you can see the status of the invoice as “Validated”, if there are no issues during validation.


Create Accounting Entries:


Click on Actions Button and Select “Create Accouting”. Click on OK button.


Now we can see the Accounted status as “Yes”.


You can see the Accounting Entries here:

Tools àView Accounting


Invoice Tables:

AP_INVOICES_ALL

AP_INVOICE_DISTRIBUTIONS_ALL


Accounting Entries Tables:

AP_ACCOUNTING_EVENTS_ALL

AP_AE_HEADERS_ALL

AP_AE_LINES_ALL


5)Making a Payment:

Go to the Invoice window and query the invoice you want to pay. You would see Amount paid as 0.00 before you make a payment.


Click Actions button. Select “Pay in full” and click “OK”.


Select the Bank Account and Document. Save the Work.


Now that the payment is made, when you query for the invoice in Invoice window, you will the Amount Paid as $4,000.00.


Create Accounting entries for payment.

Click Actions and select “Create Accounting”


Select the void checkbox to cancel the payment.


View Accounting Entries:

In the Payments window, query for the payment.

Tools menuàView Accounting


Payment Tables:

AP_INVOICE_PAYMENTS_ALL

AP_PAYMENT_SCHEDULES_ALL

AP_CHECKS_ALL

AP_CHECK_FORMATS

AP_BANK_ACCOUNTS_ALL

AP_BANK_BRANCHES

AP_TERMS


You can also pay the invoices using Payment Batch screen. Refer to the article “Make AP Payments through Payment Batches”


6)Transfer to General Ledger:

Navigation:

Payables Responsibility > View Requests

Run the concurrent program “Payables Transfer to General Ledger” with the required parameters.


Journal Import:

Refer to the Article “Order to Cash Cycle”.


Posting:

Refer to the Article “Order to Cash Cycle”.